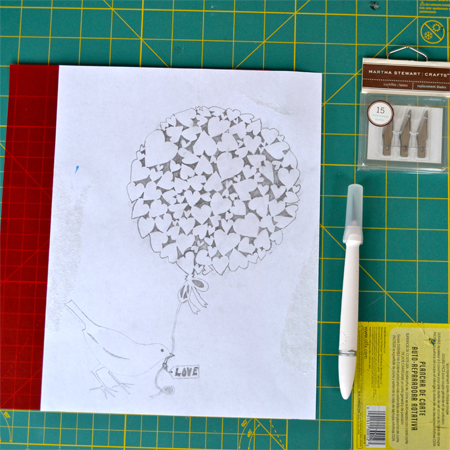
Because I'm not much of an artist and because I'm such an amateur at paper cutting, I shamelessly stole a beautiful paper cut pattern from the internet (here. Wish I had a true photo credit for it.) and then simplified it a little so that I could actually make it work for me. I added some of my own touches as well.
Here's a few tips I picked up in my class if you'd like to dabble a little in paper cutting yourself.
First, you'll need a pattern to work from. (at least I do) I sketched my pattern onto a piece of printer paper. Then you'll need a nice sheet of paper to cut the pattern onto. I decided to go with a sheet of red vellum. I figured that it isn't the easiest to tear, but it is still relatively thin. Whatever paper you choose, make sure that it is the same color all the way through.
Next, you'll want a few tools: A nice craft knife, (this one from Martha Stewart is awesome), a new sharp blade, and a self healing mat to cut on. (A smaller mat than mine is preferable so that you can turn it this way and that with more ease.)
Start cutting the small details on the interior of your pattern. You'll want the excess paper, it makes everything more stable. Go slowly and make small cuts. Once you are done with the small details, move onto the bigger details and then cut the main outline.
As you can see, my cuts are far from perfect, but oh is it satisfying seeing the end result of your hard work. It's almost magical when you carefully separate the paper cut from the outside paper. One last note: Remember to cut the paper and not yourself. That's always good advice.
Have a Happy Day!
~MJ
Sharing on:


I'm glad you posted this. I've been wanting to try it, and now I might be brave enough to do so. :)
ReplyDeleteYou definitely should! I'm so glad that I gave you a nudge.
DeleteI love doing this kind of work. One year I made many Christmas oriented cutouts and put them between pieces of glass - one colored and the other clear. My husband works with stained glass and had the materials to tape and solder them into hanging ornaments. They're always well-received.
ReplyDeleteWhat a great idea! I'm totally making ornaments out of my paper cuts this year.
DeleteThis is so fabulous! You've inspired me to do some paper cutting!
ReplyDeleteI'm so glad! It can be time consuming, but I find the end result so rewarding. Thanks for dropping by.
DeleteVery cool craft. I think this might be more work than I want to do but I liked looking at it! Thanks for showing how. Best wishes, Linda
ReplyDeletehttp://twosucculentsisters.blogspot.com/
It did take some effort to cut out all of the tiny details, but no more than a few nap times in our house. I went ahead and framed it, it makes me happy every time I look at it. Thanks for dropping by!
DeleteWow! This is really cool! Thanks for sharing :)
ReplyDeleteThank you so much! Thanks for dropping by.
DeleteHi, hope it's not too late to post a question! I have been wanting to try this for ages but didn't know where to start so thank you for the excellent tips. However, I was just wondering how the red sheet and your paper sheet stay together whilst cutting - do you have to stick them together? Many thanks
ReplyDeleteHi- Not too late at all. I actually just laid the pattern over the red vellum and then taped all four corners down to my cutting mat. I didn't experience any slippage of the red sheet, but for extra security, you could tape it down to the cutting mat as well. Remember to do all of the small inside details first. I found that, working from the inside out, the two sheets of paper tend to bind together a bit while I am cutting.
DeleteI hope that helps.
really a easy way to cut with your own style and show your feelings to your loving one.
DeleteThanks for sharing...